

'add pages' function for Blogger

Like Wordpress ,Blogger now support 'add pages' function . It's an useful function for all bloggers to make about page ,or contact page and so but it is limited to 10 pages for each blog.
Once your page is published, you can link to it from the new Pages widget. The Pages widget lets you add links to your pages as tabs at the top of your blog, or as links in your blog's sidebar.
In the Pages widget, you can decide which pages to have links and which links, and in what order they will appear. You can also choose whether or not you want links automatically created for pages when you create them by checking or unchecking the box to the left of Add New Pages by Default.

NOTE: This function is unavailable in Blogger publish mode, it work only in Blogger Draft mode, and there's no information found in Blogger Buzz . It might be because Google is in the process of testing this function. So if you don't see 'add pages' link in Blogger mode (www.blogger.com ), try to login in draft mode at draft.blogger.com
Recent post dropdown widget
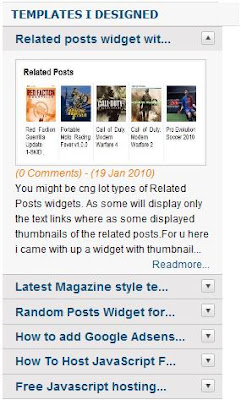
You might have seen different type of Recent post widgets showing Thumbnail with text or only text or only thumbnail. Those all widgets will show recent posts one by one in horizontal manner or vertical manner but will show all the posts. Here is a little different one which will show recent posts in a drop down manner as shown in top picture.
If you want to experience this, go to Info blog and check right side bar for the label Templates I designed.
NOTE: Please use firefox to experience this as this widget has some bug for IE with personal domain. If yyou dont use personal domain as i am using and if u have a blog address as xxxxx.blogspot.com then it will work perfectly on all browsers.
To insert this widget into ur blog follow the steps below
1) Log into ur blog and paste below code just before "]]></b:skin>"
.accordion {
float:left;
width: 260px;
border-bottom: solid 1px #c4c4c4;
}
.accordion h4 {
background: #e9e7e7 url(http://www.webdesignerwall.com/demo/jquery/images/arrow-square.gif) no-repeat right -51px;
padding: 7px 15px;
margin:0;
font: bold 120%/100% Arial, Helvetica, sans-serif;
border-top: solid 1px #c4c4c4;
border-bottom: none;
cursor: pointer;
}
.accordion h4:hover {
background-color: #e3e2e2;
}
.accordion h4.active {
background-position: right 5px;
}
.accordion p {
background: #f7f7f7;
margin: 0;
padding: 10px 15px 20px;
}
2) Now just copy and paste below code just before </head>
<script type='text/javascript'>
$(document).ready(function(){

$(".accordion h4:first").addClass("active");
$(".accordion p:not(:first)").hide();

$(".accordion h4").click(function(){
$(this).next("p").slideToggle("slow")
.siblings("p:visible").slideUp("slow");
$(this).toggleClass("active");
$(this).siblings("h4").removeClass("active");
});

});
</script>
3) Not last and final step. copy and paste below code at the place where u want to show ur widget.
<script language='JavaScript'>

imgr = new Array();
imgr[0] =
"http://sites.google.com/site/fdblogsite/Home/nothumbnail.gif";
showRandomImg = true;
jimgwidth = 220;
jimgheight = 120;
jfntsize = 12;
jacolor = "#E67C15";
jaBold = true;
jtext = "Comments";
jshowPostDate = true;
sumtitle = 25;
jsummaryPost = 200;
summaryFontsize = 12;
summaryColor = "#000";
numposts = 6;
label = "Blogger";
home_page = "http://ngsk.info/";

</script>
<div class='accordion'>

<script src='http://contact.dinhquanghuy.googlepages.com/j-label-fix.js' type='text/javascript'/>

</div>
Now change home_page url to ur blog address and label name to ur tag name.
hope u like this widget.
Random Posts Widget for Blogger
This widget will provide a link for ur users, by each click on this link provides ur users with a different post. It will give ur users a different experience, to eperience this click on "Are ya feeling lucky?" on right side bar of this blog.
How to add this widget to ur blog:
1) Login to ur blog and click on Add Gadget button.
2) Select HTML / Javascript

3) Now copy and paste below code and click on save button
<div id="myLuckyPost">
</div>
<script type="text/javascript">

function showLucky(root)
{ var feed = root.feed; var entries = feed.entry || []; var entry = feed.entry[0]; for (var j = 0; j < entry.link.length; ++j){if (entry.link[j].rel == 'alternate'){window.location = entry.link[j].href;}}} function fetchLuck(luck){ script = document.createElement('script'); script.src = '/feeds/posts/summary?start-index='+luck+'&max-results=1&alt=json-in-script&callback=showLucky'; script.type = 'text/javascript'; document.getElementsByTagName('head')[0].appendChild(script); }

function feelingLucky(root)
{ var feed = root.feed; var total = parseInt(feed.openSearch$totalResults.$t,10); var luckyNumber = Math.floor(Math.random()*total);luckyNumber++; a = document.createElement('a'); a.href = '#random'; a.rel = luckyNumber; a.onclick = function(){fetchLuck(this.rel);}; a.innerHTML = 'Are ya feeling lucky?'; document.getElementById('myLuckyPost').appendChild(a); }
</script> <script src="/feeds/posts/summary?max-results=0&alt=json-in-script&callback=feelingLucky">
</script>
Its done.
Dropcap - Giving your post a customizable look

2) Go to Layout “Edit HTML page”
3) Search for
</head>4) Now add below code just above
</head><style type='text/css'>
.dropcaps {
float: left;
padding: 3px 3px 0 0;
line-height:40px;
display: block;
color: #b4b4b4;
font:Georgia, "Times New Roman", Times, serif;
font-size:70px; }
</style>
Add below code just before "
]]></b:skin>".dropcaps {
float: left;
padding: 3px 3px 0 0;
line-height:40px;
display: block;
color: #b4b4b4;
font:Georgia, "Times New Roman", Times, serif;
font-size:70px; }
Now as a last step when ever you write a post enclose the first character / Letter of the post betwwen below tags
<span class="dropcaps">"First character / Letter" goes here</span>
When you do the above process you will find First letter of your post as shown in the figure shown at beginning of this post.
You you want to chage the color of the font and size of the font you can edit the style sheet values.
If you like this post place your valuable comments here.
Thank you
How to limit number of posts displayed in label page?
When an user or visitor to your blogger select a particular label availble in your label cloud to view the posts available for particular Label then page showing all the posts posted under that particular Label or category will be displayed. But the number of posts displayed in a page for that Label is limited to 20 posts for page, when you click on Next post link at bottom displays next 20 posts under that Label.
But now by applying a simpls hack you can increase or decrease this limit of displaying 20 posts can be changed.
1) To apply this hack follow below steps.
2) Log in your Dashboard
3) Click Layout tab | Edit HTML
4) Check the "Expand Widget Templates" box.
5) Please backup your template before any change.
6) If you have only one label on the blog layout, this is a keyword "id='Label1'" for finding it out (Use Ctrl + F to show the search box).
<b:widget id='Label1' locked='false' title='Labels' type='Label'>
<b:includable id='main'>
<b:if cond='data:title'>
<h2><data:title/></h2>
</b:if>
<div expr:class='"widget-content " + data:display + "-label-widget-content"'>
<b:if cond='data:display == "list"'>
<ul>
<b:loop values='data:labels' var='label'>
<li>
<b:if cond='data:blog.url == data:label.url'>
<span expr:dir='data:blog.languageDirection'><data:label.name/></span>
<b:else/>
<a expr:dir='data:blog.languageDirection' expr:href='data:label.url'><data:label.name/></a>
</b:if>
<b:if cond='data:showFreqNumbers'>
<span dir='ltr'>(<data:label.count/>)</span>
</b:if>
</li>
</b:loop>
</ul>
<b:else/>
<b:loop values='data:labels' var='label'>
<span expr:class='"label-size label-size-" + data:label.cssSize'>
<b:if cond='data:blog.url == data:label.url'>
<span expr:dir='data:blog.languageDirection'><data:label.name/></span>
<b:else/>
<a expr:dir='data:blog.languageDirection' expr:href='data:label.url'><data:label.name/></a>
</b:if>
<b:if cond='data:showFreqNumbers'>
<span class='label-count' dir='ltr'>(<data:label.count/>)</span>
</b:if>
</span>
</b:loop>
</b:if>
<b:include name='quickedit'/>
</div>
</b:includable>
</b:widget>
Now add the red colored code where is it shown in below code.
<b:widget id='Label1' locked='false' title='Labels' type='Label'>
<b:includable id='main'>
<b:if cond='data:title'>
<h2><data:title/></h2>
</b:if>
<div expr:class='"widget-content " + data:display + "-label-widget-content"'>
<b:if cond='data:display == "list"'>
<ul>
<b:loop values='data:labels' var='label'>
<li>
<b:if cond='data:blog.url == data:label.url'>
<span expr:dir='data:blog.languageDirection'><data:label.name/></span>
<b:else/>
<a expr:dir='data:blog.languageDirection' expr:href='data:label.url + "?max-results=4"'><data:label.name/></a>
</b:if>
<b:if cond='data:showFreqNumbers'>
<span dir='ltr'>(<data:label.count/>)</span>
</b:if>
</li>
</b:loop>
</ul>
<b:else/>
<b:loop values='data:labels' var='label'>
<span expr:class='"label-size label-size-" + data:label.cssSize'>
<b:if cond='data:blog.url == data:label.url'>
<span expr:dir='data:blog.languageDirection'><data:label.name/></span>
<b:else/>
<a expr:dir='data:blog.languageDirection' expr:href='data:label.url + "?max-results=4"'><data:label.name/></a>
</b:if>
<b:if cond='data:showFreqNumbers'>
<span class='label-count' dir='ltr'>(<data:label.count/>)</span>
</b:if>
</span>
</b:loop>
</b:if>
<b:include name='quickedit'/>
</div>
</b:includable>
</b:widget>
Before applying this hack the url when selected particular Label will be shown as follows
http://yourblogname.blogspot.com/search/label/Selected label name
But after applying this hack it just looks as follows
http://yourblogname.blogspot.com/search/label/Selected label name?max-results="yournumber"
Happy trick.
If you like my work to help you please leave me your valuable comments.
Thank you.
Related post widget for blogger
You might be haring about Related posts widget for blogger which makes visiter to your blog to spend more time on your blog.This widget not only making visiter to spend more time on your blog reading your posts, by this your CTR will increase in google which inturn increases your ads from adsense or other means which give you good revenue.
WE all know WordPress has got many plug-ins which do the same purpose, but as such feature is not present in Blogger By default. We have various hacks and Tips for Blogger blogs already, with some popular ones for this Widget.
The basic difference in the related posts widget for Blogger and those for WordPress are : the WordPress Plug-ins are more customizable and actually relate posts considering category, tags and content. While the Related Posts for Blogger does so using only the Categories in which you place the post. So for Better optimality of the Widget, limit the number of categories to just one or two. More categories would mean too many related posts.
Here i have collected hack for related post by few of fellow bloggers.
1)From widgetsforfree
Here is a simple and stylish widget from Widgets for free with customizable style sheet.
2)From Tweaked hack by Jackbook
Jackbook had tweaked the the Original hack by Hoctro, and made it a single install widget, and also removed current article being listed in related articles. So the hack is quite simple and you can try it out too. My say: Read on - better hacks are coming. Jackbook – related post widget
By taking jackbook widget i am trying to make few modification which i will be posting very soon.
If you like my post or to correct or add another type of Related post widget please leave a comment or mail me at softwaretester@gmail.com
Thank you
Bookmark widget - Part1
You may be seeing bookmaak icons below or above of each paost in so many blogs you visiting. This bookmark widgets sre the one of the simple ways to attract people to your blogs and also helps in increasing traffic to small blogs.
There are so many ways to insert this widget into you blog.
Here i am with one of the Bookmark widget which will not work like other bookmark widgets which will add individual posts to the social sites, this widget works in a different manner as it will add your total blog to the social sites.
To add this widget a simple method.
Login to Blooger dashboard --> Go to Layout page --> Click on Add Gadget
Select Add HTML/Javascript
Now Insert Below code into HTML/Javascript box and save it.
After adding this code a widget will appear in Sidebar as it look like below.

This is a simple one and in my next posts i will give you different types of adding bookmarks.
Breadcrumbs to your Blog
Breadcrumbs nothing but in other words page navigation which shows where you are and helps you to go to previous page. This feature gives your blog a professional look.
Suppose if you are viewing “Ads in middle of posts” post in my blog it there appears a breadcrumb at top of page like “You are at » Home » Tricks » Ads in middle of posts”. When you click on Home link in this it will take to my blog hoe page.

To apply these codes on your blog follow below instructions.
Before applying this code save your template
Go to the Layout tab, and click Edit HTML. Download your template as an XML-file and save it onto your harddisk. If anything goes wrong, upload it again and not much harm will be done.
We are going to modify the code which displays status-message above your posts when you have selected all posts with a certain label. The default-widget uses a so-called "includable" (a chunk of code. We will turn off this default status message, and replace it with our breadcrumbs.
Step 1: Go to Edit HTML page and check Expand widget template check box.
Scroll down through your expanded widget code and look for the following piece of code:
<b:includable id='main' var='top'>
<!-- posts -->
<div class='blog-posts hfeed'>
<b:include data='top' name='status-message'/>
<data:adStart/>
Now comment the status message lines by adding code in red
<b:includable id='main' var='top'>
<!-- posts -->
<div class='blog-posts hfeed'>
<!-- <b:include data='top' name='status-message'/> -->
<data:adStart/>
<b:includable id='main' var='top'>
<!-- posts -->
<div class='blog-posts hfeed'>
<!-- <b:include data='top' name='status-message'/> -->
<b:include data='posts' name='breadcrumb'/>
<data:adStart/>
<b:includable id='breadcrumb' var='posts'> <b:if cond='data:blog.homepageUrl == data:blog.url'> <!-- No breadcrumb on front page --> <b:else/> <b:if cond='data:blog.pageType == "item"'> <div class='breadcrumbs'> Browse » <a expr:href='data:blog.homepageUrl' rel='tag'>Home</a> <b:loop values='data:posts' var='post'> <b:if cond='data:post.labels'> <b:loop values='data:post.labels' var='label'> <b:if cond='data:label.isLast == "true"'> » <a expr:href='data:label.url' rel='tag'><data:label.name/></a> </b:if> </b:loop> » <span><data:post.title/></span> </b:if> </b:loop> </div> <b:else/> <b:if cond='data:blog.pageType == "archive"'> <div class='breadcrumbs'> Browse » <a expr:href='data:blog.homepageUrl'>Home</a> » Archives for <data:blog.pageName/> </div> <b:else/> <b:if cond='data:blog.pageType == "index"'> <div class='breadcrumbs'> <b:if cond='data:blog.pageName == ""'> Browse » <a expr:href='data:blog.homepageUrl'>Home</a> » All posts <b:else/> Browse » <a expr:href='data:blog.homepageUrl'>Home</a> » Posts filed under <data:blog.pageName/> </b:if> </div> </b:if> </b:if> </b:if> </b:if> </b:includable> <b:includable id='main' var='top'>Step 4: Optional
If you want to give your breadcrumb some look and feel add below CSS to your CSS style sheet.
<b:skin><![CDATA[/*
....
.breadcrumbs {
float: left;
width: 500px;
font-size: 12px;
margin: 5px 10px 10px 10px;
padding: 0px 0px 3px 0px;
border-bottom: double #EAEAEA;
}
....
]]></b:skin>
Step 5: Save you template.
NOTE: My suggestion is to add a comment
<!-- Breadcrumb code start --> at the begining of code you are adding.
And <!-- Breadcrumb code ends --> at the end of code you are adding.
So that you can delete the added code doesn’t work properly or when you don’t want it on your blog.
Ads in middle of posts
Every people want to place the ads in the middle of the posts as this help them to get good revenue. How to insert ads in middle of posts?
Here goes a small trick to insert your Adsense ads into middle of your posts.
Before going for this trick Save your template.
To save your template
Go to the Layout tab, and click Edit HTML.
Download your template as an XML-file and save it onto your harddisk. If anything goes wrong, upload it again and not much harm will be done.
Step 1: Login to Blogger dashboard and go to Edit HTML page.
Step 2: You must check Expand Widget Templates check box and Find the tag <data:post.body/>
Step 3: Now replace above code with below code
<div expr:id='"aim1" + data:post.id'></div>
<div style="clear:both; margin:10px 0">
<!-- Your AdSense code here -->
</div>
<div expr:id='"aim2" + data:post.id'>
<data:post.body/>
</div>
<script type="text/javascript">
var obj0=document.getElementById("aim1<data:post.id/>");
var obj1=document.getElementById("aim2<data:post.id/>");
var s=obj1.innerHTML;
var r=s.search(/\x3C!-- adsense --\x3E/igm);
if(r>0) {obj0.innerHTML=s.substr(0,r);obj1.innerHTML=s.substr(r+16);}
</script>

Step 4: Now note that you must replace <!-- Your AdSense code --> with your Adsense code..

Step 5: In every blog post put a special comment
<!-- adsense -->
in the exact point where you want to your AdSense advertising to be appeared.
Step 6: Save template.
Auto Read more option for blogger posts
Previously you might have inserted Read more option using
<Span class=”fullpost”> </span>
Before going for this trick Save your template.
To save your template
Go to the Layout tab, and click Edit HTML.
Download your template as an XML-file and save it onto your harddisk. If anything goes wrong, upload it again and not much harm will be done.
But here is a simple method which saves your time and after inseting this code your blog main page will look as below.

Step 1: Go to Edit Html page and check Expand widget template check box and search for below code.
<div class='post-body entry-content'>
<p><data:post.body/></p>
<div style='clear: both;'/> <!-- clear for photos floats -->
</div>
OR just search for below code
<p><data:post.body/></p>
Step 2: Replace the line marked in red color in above code with below code.
<b:if cond='data:blog.pageType != "item"'>
<div expr:id='"summary" + data:post.id'/>
<script type='text/javascript'>
var blogID = "Your Blog ID";
function retriveSummaryPost<data:post.id/>(json){document.getElementById("summary<data:post.id/>").innerHTML
= json.entry.summary.$t + "..."}
function createSummaryPost<data:post.id/>(POSTID){ var script = document.createElement("script");
script.src = "http://www.blogger.com/feeds/"+blogID+"/posts/summary/"+POSTID+"?alt=json-in-script&callback=retriveSummaryPost<data:post.id/>";
script.type = "text/javascript"; document.getElementsByTagName('head')[0].appendChild(script);}
</script>
<script type='text/javascript'>
createSummaryPost<data:post.id/>("<data:post.id/>");
</script>
<span class='rmlink' style='float:right'><a expr:href='data:post.url'>-->Read more...</a></span>
</b:if>
<b:if cond='data:blog.pageType == "item"'>
<div id='post_body'>
<data:post.body/>
</div>
</b:if>
How to find your Blog ID.
Log into Blogger dashboard and click on Layout link now you can find your Blog id in link bar as shown in image below.

Hiding Blogger navigation bar
You may feel odd by displaying of blogger navigation at top of you blog.
 To hide this nav bar here is a small trick.
Before going for this trick Save your template.
To save your template
Go to the Layout tab, and click Edit HTML.
Download your template as an XML-file and save it onto your harddisk. If anything goes wrong, upload it again and not much harm will be done.
Step 1: Login to blogger » Go to Layout page » Click on Edit HTML link » add below code just below <head> tag.
#navbar-iframe {
height: 0px;
visibility: hidden;
display: none;
}
Step 2: Preview template and Save Template.
How To Hide Label Count
You may be watching that there will a count will be displaying by the side of your Labels showing how many posts were there under each and every Label. Sometimes it looks odd for the people visiting your site.
So here is a simple hack to remove that Label count beside each Label.
Before going for this trick Save your template.
To save your template
Go to the Layout tab, and click Edit HTML.
Download your template as an XML-file and save it onto your harddisk. If anything goes wrong, upload it again and not much harm will be done.
Before applying below hack Label widget look like.

Step 1: Sign into Blogger dashboard » Go to "Layout" page » Click on "Edit html" link » Click on "Expand Widget Templates"
Step 2: Look for below code
<b:else/>
<a expr:dir='data:blog.languageDirection' expr:href='data:label.url'>
<data:label.name/>
</a>
</b:if>
<span dir='ltr'>(<data:label.count/>)</span>
</li>
</b:loop>
</ul>
<b:include name='quickedit'/>
In some templates above code will be in different format as shown below then remove the code marked in red in below code.
<b:loop values='data:labels' var='label'>
<li>
<b:if cond='data:blog.url == data:label.url'>
<data:label.name/><b:else/>
<a expr:href='data:label.url'><data:label.name/></a>
</b:if>(<data:label.count/>)
</li>
</b:loop>
</ul>
<b:include name='quickedit'/>
Step 3: Remove code marked red in above code
<span dir='ltr'>(<data:label.count/>)</span>
(OR)
(<data:label.count/>)
Step 4: Preview and Save the template.
After aplling above hack Label widget will look like

Adding meta tags to individual posts
I suggest not to go for this trick as if you want to add keywords to each and every post there should be “if condition” added for each and every post for example if you have 20 post in your blog then you have to add 20 if conditions. Which increase the weight on the page, like loading page and so?
However I recommend adding new keyword regarding your new post to your existing Meta tag. But if you still want to have this trick it is here.
Before going for this trick Save your template.
To save your template
Go to the Layout tab, and click Edit HTML.
Download your template as an XML-file and save it onto your harddisk. If anything goes wrong, upload it again and not much harm will be done.
Step by Step to add Different Meta tags description For Each Post in your blogspot blog.
Step 1. Find code below
<meta content='Your home page description' name='description'/>
<meta content='your keywords, keywords1, keyword2' name='keywords'/>
Step 2. Add red code to it. This should be your final code.
<b:if cond='data:blog.url == data:blog.homepageUrl'>
<meta content='Your home page description' name='description'/>
<meta content='your keywords, keywords1, keyword2' name='keywords'/>
</b:if>
Step 3.Now add below code just bottom of above code. This code is for the Meta tags for individual posts.<b:if cond='data:blog.pageType == "item"'>
<meta expr:content='data:blog.pageTitle' name='Description'/>
<meta expr:content='data:blog.pageName + ", your keywords, keywords1, keyword2 "' name='keywords'/>
</b:if>
Step 4. Don't forget to change description and keyword to your own. save it and done.
Don’t forget to change 'Your home page description' with your Site description,
'your keywords, keywords1, keyword2' with your site keywords and finally
In the below code change keyword to your page keywords'data:blog.pageName + ", your keywords, keywords1, keyword2"'
Happy Try if you find any difficulty please post a comment i will help you out.


