

'add pages' function for Blogger

Like Wordpress ,Blogger now support 'add pages' function . It's an useful function for all bloggers to make about page ,or contact page and so but it is limited to 10 pages for each blog.
Once your page is published, you can link to it from the new Pages widget. The Pages widget lets you add links to your pages as tabs at the top of your blog, or as links in your blog's sidebar.
In the Pages widget, you can decide which pages to have links and which links, and in what order they will appear. You can also choose whether or not you want links automatically created for pages when you create them by checking or unchecking the box to the left of Add New Pages by Default.

NOTE: This function is unavailable in Blogger publish mode, it work only in Blogger Draft mode, and there's no information found in Blogger Buzz . It might be because Google is in the process of testing this function. So if you don't see 'add pages' link in Blogger mode (www.blogger.com ), try to login in draft mode at draft.blogger.com
Recent post dropdown widget
You might have seen different type of Recent post widgets showing Thumbnail with text or only text or only thumbnail. Those all widgets will show recent posts one by one in horizontal manner or vertical manner but will show all the posts. Here is a little different one which will show recent posts in a drop down manner as shown in top picture.
If you want to experience this, go to Info blog and check right side bar for the label Templates I designed.
NOTE: Please use firefox to experience this as this widget has some bug for IE with personal domain. If yyou dont use personal domain as i am using and if u have a blog address as xxxxx.blogspot.com then it will work perfectly on all browsers.
To insert this widget into ur blog follow the steps below
1) Log into ur blog and paste below code just before "]]></b:skin>"
.accordion {
float:left;
width: 260px;
border-bottom: solid 1px #c4c4c4;
}
.accordion h4 {
background: #e9e7e7 url(http://www.webdesignerwall.com/demo/jquery/images/arrow-square.gif) no-repeat right -51px;
padding: 7px 15px;
margin:0;
font: bold 120%/100% Arial, Helvetica, sans-serif;
border-top: solid 1px #c4c4c4;
border-bottom: none;
cursor: pointer;
}
.accordion h4:hover {
background-color: #e3e2e2;
}
.accordion h4.active {
background-position: right 5px;
}
.accordion p {
background: #f7f7f7;
margin: 0;
padding: 10px 15px 20px;
}
2) Now just copy and paste below code just before </head>
<script type='text/javascript'>
$(document).ready(function(){

$(".accordion h4:first").addClass("active");
$(".accordion p:not(:first)").hide();

$(".accordion h4").click(function(){
$(this).next("p").slideToggle("slow")
.siblings("p:visible").slideUp("slow");
$(this).toggleClass("active");
$(this).siblings("h4").removeClass("active");
});

});
</script>
3) Not last and final step. copy and paste below code at the place where u want to show ur widget.
<script language='JavaScript'>

imgr = new Array();
imgr[0] =
"http://sites.google.com/site/fdblogsite/Home/nothumbnail.gif";
showRandomImg = true;
jimgwidth = 220;
jimgheight = 120;
jfntsize = 12;
jacolor = "#E67C15";
jaBold = true;
jtext = "Comments";
jshowPostDate = true;
sumtitle = 25;
jsummaryPost = 200;
summaryFontsize = 12;
summaryColor = "#000";
numposts = 6;
label = "Blogger";
home_page = "http://ngsk.info/";

</script>
<div class='accordion'>

<script src='http://contact.dinhquanghuy.googlepages.com/j-label-fix.js' type='text/javascript'/>

</div>
Now change home_page url to ur blog address and label name to ur tag name.
hope u like this widget.
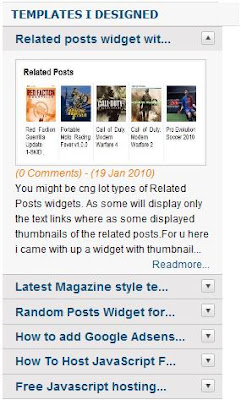
Related posts widget with thumbnails

You might be cng lot types of Related Posts widgets. As some will display only the text links where as some displayed thumbnails of the related posts.
For u here i came with up a widget with thumbnails which will really suits ur blogger templates and will not show duplicate entries.
to add this widget to ur blog follow these steps.
1) Login to ur blogger account and place below code exactly <Head> tag
<b:if cond='data:blog.pageType == "item"'>
<style type='text/css'>
#related-posts {
float:center;
text-transform:none;
height:100%;
min-height:100%;
padding-top:5px;
padding-left:5px;
}

#related-posts h2{
font-size: 1.6em;
font-weight: bold;
color: black;
font-family: Georgia, “Times New Roman”, Times, serif;
margin-bottom: 0.75em;
margin-top: 0em;
padding-top: 0em;
}
#related-posts a{
color:black;
}
#related-posts a:hover{
color:black;
}

#related-posts  a:hover {
background-color:#d4eaf2;
}
</style>

<script type='text/javascript'>
//<![CDATA[

//Script by Aneesh of www.bloggerplugins.org
//Released on August 19th August 2009
var relatedTitles = new Array();
var relatedTitlesNum = 0;
var relatedUrls = new Array();
var thumburl = new Array();
function related_results_labels_thumbs(json) {
for (var i = 0; i < json.feed.entry.length; i++) {
var entry = json.feed.entry[i];
relatedTitles[relatedTitlesNum] = entry.title.$t;
try
{thumburl[relatedTitlesNum]=entry.media$thumbnail.url;}


catch (error){
s=entry.content.$t;a=s.indexOf("<img");b=s.indexOf("src=\"",a);c=s.indexOf("\"",b+5);d=s.substr(b+5,c-b-5);if((a!=-1)&&(b!=-1)&&(c!=-1)&&(d!="")){
thumburl[relatedTitlesNum]=d;} else thumburl[relatedTitlesNum]='https://blogger.googleusercontent.com/img/b/R29vZ2xl/AVvXsEinbmlBXdPt2jaZvh7OFc8OJ2pqNc9x4d0VOskkO3ghQbs88u6LmEnx2MMcJzwGIk1tgOBebbAdYh7EZ7lkOuzKzXWGFmEQ0Wk6B-bPf7lmdFQWy-0DAWyikhD8Cmk7TP7xYj-XQ9Y3gCVK/';


}

if(relatedTitles[relatedTitlesNum].length>35) relatedTitles[relatedTitlesNum]=relatedTitles[relatedTitlesNum].substring(0, 35)+"...";
for (var k = 0; k < entry.link.length; k++) {
if (entry.link[k].rel == 'alternate') {
relatedUrls[relatedTitlesNum] = entry.link[k].href;
relatedTitlesNum++;


}
}
}
}
function removeRelatedDuplicates_thumbs() {
var tmp = new Array(0);
var tmp2 = new Array(0);
var tmp3 = new Array(0);
for(var i = 0; i < relatedUrls.length; i++) {
if(!contains_thumbs(tmp, relatedUrls[i]))
{
tmp.length += 1;
tmp[tmp.length - 1] = relatedUrls[i];
tmp2.length += 1;
tmp3.length += 1;
tmp2[tmp2.length - 1] = relatedTitles[i];
tmp3[tmp3.length - 1] = thumburl[i];
}
}
relatedTitles = tmp2;
relatedUrls = tmp;
thumburl=tmp3;


}

function contains_thumbs(a, e) {
for(var j = 0; j < a.length; j++) if (a[j]==e) return true;
return false;
}
function printRelatedLabels_thumbs() {
for(var i = 0; i < relatedUrls.length; i++)
{
if((relatedUrls[i]==currentposturl)||(!(relatedTitles[i])))
{
relatedUrls.splice(i,1);
relatedTitles.splice(i,1);
thumburl.splice(i,1);

}
}


var r = Math.floor((relatedTitles.length - 1) * Math.random());
var i = 0;

if(relatedTitles.length>0) document.write('<h2>'+relatedpoststitle+'</h2>');
document.write('<div style="clear: both;"/>');
while (i < relatedTitles.length && i < 20 && i<maxresults) {


document.write('<a style="text-decoration:none;padding:5px;float:left;');
if(i!=0) document.write('border-left:solid 0.5px #d4eaf2;"');
else document.write('"');
document.write(' href="' + relatedUrls[r] + '"><img style="width:72px;height:72px;border:0px;" src="'+thumburl[r]+'"/><br/><div style="width:72px;padding-left:3px;height:65px;border: 0pt none ; margin: 3px 0pt 0pt; padding: 0pt; font-style: normal; font-variant: normal; font-weight: normal; font-size: 12px; line-height: normal; font-size-adjust: none; font-stretch: normal;">'+relatedTitles[r]+'</div></a>');


if (r < relatedTitles.length - 1) {
r++;
} else {
r = 0;
}
i++;
}
document.write('</div>');

}

//]]>
</script>

</b:if>
2) Now just place below code at the place where u want to show ur related posts, may be at sidebar and mostly u will like to past it at the fotter of the post.
<b:if cond='data:blog.pageType == "item"'>
<div id='related-posts'>
<b:loop values='data:post.labels' var='label'>
<b:if cond='data:label.isLast != "true"'>
</b:if>
<b:if cond='data:blog.pageType == "item"'>
<script expr:src='"/feeds/posts/default/-/" + data:label.name + "?alt=json-in-script&callback=related_results_labels_thumbs&max-results=6"' type='text/javascript'/></b:if></b:loop><a href='http://www.bloggerplugins.org/2009/08/related-posts-thumbnails-blogger-widget.html' style='display:none;'>Related Posts with thumbnails for blogger</a><a href='http://www.bloggerplugins.org/' style='display:none;'>blogger tutorials</a>
<script type='text/javascript'>
var currentposturl="<data:post.url/>";
var maxresults=5;
var relatedpoststitle="Related Posts";
removeRelatedDuplicates_thumbs();
printRelatedLabels_thumbs();
</script>
</div><div style='clear:both'/>
</b:if>
Random Posts Widget for Blogger
This widget will provide a link for ur users, by each click on this link provides ur users with a different post. It will give ur users a different experience, to eperience this click on "Are ya feeling lucky?" on right side bar of this blog.
How to add this widget to ur blog:
1) Login to ur blog and click on Add Gadget button.
2) Select HTML / Javascript

3) Now copy and paste below code and click on save button
<div id="myLuckyPost">
</div>
<script type="text/javascript">

function showLucky(root)
{ var feed = root.feed; var entries = feed.entry || []; var entry = feed.entry[0]; for (var j = 0; j < entry.link.length; ++j){if (entry.link[j].rel == 'alternate'){window.location = entry.link[j].href;}}} function fetchLuck(luck){ script = document.createElement('script'); script.src = '/feeds/posts/summary?start-index='+luck+'&max-results=1&alt=json-in-script&callback=showLucky'; script.type = 'text/javascript'; document.getElementsByTagName('head')[0].appendChild(script); }

function feelingLucky(root)
{ var feed = root.feed; var total = parseInt(feed.openSearch$totalResults.$t,10); var luckyNumber = Math.floor(Math.random()*total);luckyNumber++; a = document.createElement('a'); a.href = '#random'; a.rel = luckyNumber; a.onclick = function(){fetchLuck(this.rel);}; a.innerHTML = 'Are ya feeling lucky?'; document.getElementById('myLuckyPost').appendChild(a); }
</script> <script src="/feeds/posts/summary?max-results=0&alt=json-in-script&callback=feelingLucky">
</script>
Its done.
Creating Cookie to Display time of last visit of the user
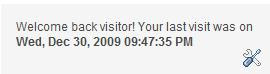
This script records the date+time of last visit of the user and displays it once the same user return back to you site / Blog. If this is the first visit for the user, a greeting message is shown.
1.Login to your dashboard--> layout- ->Page Elements
2.Click on 'Add a Gadget' on the sidebar.
3.Select 'HTML/Javascript' and add the code given below and click save.
<script type="text/javascript">
var days = 730; // days until cookie expires = 2 years.
var lastvisit=new Object();
var firstvisitmsg="This is your first visit to this page. Welcome!";
lastvisit.subsequentvisitmsg="Welcome back visitor! Your last visit was on <b>[displaydate]</b>";

lastvisit.getCookie=function(Name){
var re=new RegExp(Name+"=[^;]+", "i");
if (document.cookie.match(re))
return document.cookie.match(re)[0].split("=")[1];
return'';
}

lastvisit.setCookie=function(name, value, days){
var expireDate = new Date();

var expstring=expireDate.setDate(expireDate.getDate()+parseInt(days));
document.cookie = name+"="+value+"; expires="+expireDate.toGMTString()+"; path=/";
}

lastvisit.showmessage = function() {
var wh = new Date();
if (lastvisit.getCookie("visitc") == "") {
lastvisit.setCookie("visitc", wh, days);
document.write(firstvisitmsg);
}

else {
var lv = lastvisit.getCookie("visitc");
var lvp = Date.parse(lv);
var now = new Date();
now.setTime(lvp);
var day = new Array("Sun", "Mon", "Tues", "Wed", "Thur", "Fri", "Sat");
var month = new Array ("Jan", "Feb", "Mar", "Apr", "May", "Jun", "Jul", "Aug", "Sep", "Oct", "Nov", "Dec");
var dd = now.getDate();
var dy = now.getDay();
dy = day[dy];
var mn = now.getMonth();
mn = month[mn];
yy = now.getFullYear();
var hh = now.getHours();
var ampm = "AM";
if (hh >= 12) {ampm = "PM"}
if (hh >12){hh = hh - 12};
if (hh == 0) {hh = 12}
if (hh < 10) {hh = "0" + hh};
var mins = now.getMinutes();
if (mins < 10) {mins = "0"+ mins}
var secs = now.getSeconds();
if (secs < 10) {secs = "0" + secs}
var dispDate = dy + ", " + mn + " " + dd + ", " + yy + " " + hh + ":" + mins + ":" + secs + " " + ampm
document.write(lastvisit.subsequentvisitmsg.replace("\[displaydate\]", dispDate))
}

lastvisit.setCookie("visitc", wh, days);

}

lastvisit.showmessage();
</script>
Onthis blog you can this script just installed beneath Feed count widget
Contact Form for Blogger - Hosting free (Part 2)
In first part of Contact Form for Blogger - Hosting free we learnt how to create a free hosting account and extend webspace and make it to unlimited traffic.
In this part I will show you how to host the contact form and use it in your blog.
Extracting Free Contact Form scripts and editing few lines of code.
1) Download free contact form script from any of below links
Contact Form - Rar Format
2) Unzip the downloaded with Rar (download Rar here)
3) First open config.php file with notepad and enter your Email ID where you want to recieve the comments sent by user through this contact form, at following line of code
$email_it_to = "yourEmail Address";
4) Now open form_error.php file with notepad and enter the URL of your Contact Form (I will be eexplaining how to get the URL of the contact form later in this post)
URL=your contact form URL"/>
You can find above line of code at top of the file itself.
There is one more change in this file, just change the "Your Blog URL" to your blog home paage link
You will be redirected to Contact form page within 10 sec (or) click here to go back --------Your Blog URL">Blog
This line of code will be the end of the file.
5) Last but not least open thankyou.php file and change "Your Blog URL" to your Blog home page link.
Uploading files to your free hosting account with 6te
You can upload these files using File zilla ftp transfer tool (or) directly by login to your account.
1) Login to your account and click on File Manager link
2) Provide your login credentials for FTP and login to ftp folder
3) Now here is the main step, you can upload directly to main directry or you can create a sub directry and upload the files.
a) If you want to upload to your main dir then just click on "Upload" button at top of the page and just upload the files.
If you upload the files to your main dir then your contact form URl will be
your-6te-url/form.php
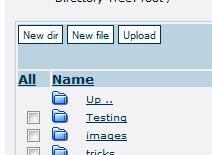
b) IF you want to upload to a sub dir then click on "New dir" button available at top of the page and enter your desired folder name. Now follow the same steps mentioned in point "a" to upload the files.
If you follow this process then your contact form URL will be
your-6te-url/your folder name/form.php
This is the final step, now logon to blogger and insert your contact form link at your desired place in your blog (there is no need to use target="_blank to open contact form in different page, as once the user submits the form user will be redirected to your blog automatically.
Hope this post is helpful to you for creating your own contact form. If so please leave your comments.
Contact Form for Blogger - Hosting free (Part 1)
Lot of people whoever uses BlogSpot is concerned about inserting a professional contact form into their blogs. They follow some methods like, by posting comments or some other method to get the solution. I am also a sufferer in this matter, but I found a good solution for this which you can experience by clicking it here.
Before finding this method I too tried to go for different sources which I mentioned in my previous post Contact forms for Blogspot
In this new method, I hosted my contact form free. I am going to explain step by step process to host your contact form free. Contact form I used here is a PHP form with all features like validation, spam prevention, auto sending of comments to your desired mail box. As it is a detailed description I want to extend it to two posts (two parts).
First I want to say thanks to 6te for providing a service to host files free and Free Contact Formfor providing a basic Contact form scripts free- later I made few modifications to those scripts.
In this first part, I want to explain how to get free hosting service from 6te and increase your storage limit and traffic limit to unlimited. I am using this service to host contact form for 6 of my blogs free with unlimited traffic.
1) Go to Freewebhosting
2) Enter desired sub domain name and select the main domain name from drop down as show below and click on proceed button.

3) If you own a sub domain name just enter your sub domain name under Free domain hosting section and click on proceed button.

4) Enter your details in the displayed page and click on continue button. Your confirmed details will be displayed and sent to your mail ID that you provided.

5) Now go to 6te login and login with your credentials.
6) Click on Account Manager.

7) Select Level 3 – Popunder (1500MB webspace, unlimited traffic) option and click on Finished button.

Selecting popunder will not effect your blog as this is a separate sub domain or domain page, ads will be popup for the contact page and not for your blog.
In next part of the post i will explain how to host the Contact form and use it in your blog
Free Forms for Blogger & Websites
Naturally, blogs include a method of getting in contact with the publisher of the site – through comments. However, this isn’t the best method for contacting the owner, especially if you need to give personal details or something that can’t be shared with the entire community.Therefore, it is essential to place some type of contact form on your blog.
If you are looking to place a Contact form in your blogger then this post is going to help you. Placing a Contact form in blogger blogs is little confusing if you don’t own a hosting account, but it is simple task. All you need to do just create a new post and put a form code (Provided by following sites below) in body section of your post and publish it. That's it.
There are various sites across the web, which offers free forms to use for Blogger & Websites. Here I am going to share top sites of my research, which offers free forms for Blogger & Websites with embedded code. These results are by my search through net and other blogs.
1. Google Docs
Google Docs provide embedded code forms for your blog or website. Just login to Google Docs and click on the New > From Template > Forms. Choose form of your choice and copy embedded code. Follow steps mentioned below. How to create a Contact form from Google doc is perfectly explaned by one of my fellow blogger in his blog Simplex Design.

2. Form Smarts
FormSmarts is an integrated web form service that lets you create forms, publish them online, and get form results. Add a web form to your site or blog, or let visitors access your form from MySpace®, Facebook®, and anywhere you can post a link.

3. Kontactr
Kontactr is a one-click free contact form service. With Kontactr, you can fight against the amount of spam that you receive daily. Protect your email address by using our highly secure contact form. You can also use our simple tools to embed the form right into your own website.

4. Wufoo
Wufoo offers easy, copy/paste solutions for integrating a Wufoo form into a web page. For advanced users, full CSS and XHTML markup is also included. To simplify the process even further, the intuitive Wufoo theme manager allows you to customize the look of your form with a few clicks of the mouse so that your form seamlessly matches the look of your site.

5. ZOHO
Zoho Creator provides you with an easy drag-and-drop html form builder to build html forms online. Zoho Creator also makes it easy to embed HTML Forms in your website through simple copy/paste. Once you have collected data through HTML Forms, you can manage and edit the collected data online and share the data with others

6. My Contact Form
It is now easier than ever to keep in touch with your site's visitors. The arduous task of creating contact forms, email forms, feedback forms, questionnaires, surveys, order forms, polls, or any other type of web form is a thing of the past!

7. Free Contact Form
Script provided by this site works for a wide variety of website forms, not just contact us forms. These scripts are sometimes refered to as the following: contact form, website contact form, email form, PHP contact form, Javascript contact form, form to email, form 2 email, form2email, form generator, form builder, form maker, automatic contact form or contact form script.

8. FormSpring
FormSpring gives businesses and organizations an easy way to build any type of online form, integrate it with their website and begin collecting data. Once you have started collecting that data you can use the information you gathered in our online database or export it. With FormSpring anyone can build all types of web forms, collect data online and do it simply and efficiently.

9. Web Form Designer
WebFormDesigner can automatically validate your user's input - ensure the required fields are properly complete, and check that a valid email is input. Restrict input to alphanumeric, numerals only or just letters.

10. Kampyle
Customize the look and feel of your feedback forms to fit your website's, as well as your business needs. Create multiple feedback forms for different locations of your website with the relevant questions for each page.

11. Mailjol
This site provides a solution that allows you to create various forms. However, I noticed that the styling isn’t the most ideal of all solutions, but is desirable if you want a more contact-like rather than survey-like version.
A number of the key features include: No Ads, Unlimited Questions, Easy Form Creator, Spam Protection, and more.
12. WRASAP
Despite the rather ridiculous acronym for a simple tool, this “Will Reply As Soon As Possible” contact form does one thing – allows you to place a contact form on your website or blog. It sends you an email message with each new comment, and integrates a CAPTCHA-driven spam filter. Essentially, it’s just a customizable webpage with a contact form.

13. Response-O-Matic
Ideal for people who want an effective solution, this site offers the ability to create a contact form without the need to learn HTML. Simply tell the wizard what you want to see in your form, then copy and paste the code into your website – it’s truly that easy.
The free account is limited but should suit most users.

14. Odio
A simple and easy-to-use contact form for placing on nearly any site.

If you have any other work-arounds for placing contact forms in non-WordPress blogs, please let me know through the comments
Dropcap - Giving your post a customizable look

2) Go to Layout “Edit HTML page”
3) Search for
</head>4) Now add below code just above
</head><style type='text/css'>
.dropcaps {
float: left;
padding: 3px 3px 0 0;
line-height:40px;
display: block;
color: #b4b4b4;
font:Georgia, "Times New Roman", Times, serif;
font-size:70px; }
</style>
Add below code just before "
]]></b:skin>".dropcaps {
float: left;
padding: 3px 3px 0 0;
line-height:40px;
display: block;
color: #b4b4b4;
font:Georgia, "Times New Roman", Times, serif;
font-size:70px; }
Now as a last step when ever you write a post enclose the first character / Letter of the post betwwen below tags
<span class="dropcaps">"First character / Letter" goes here</span>
When you do the above process you will find First letter of your post as shown in the figure shown at beginning of this post.
You you want to chage the color of the font and size of the font you can edit the style sheet values.
If you like this post place your valuable comments here.
Thank you
Related post widget for blogger
You might be haring about Related posts widget for blogger which makes visiter to your blog to spend more time on your blog.This widget not only making visiter to spend more time on your blog reading your posts, by this your CTR will increase in google which inturn increases your ads from adsense or other means which give you good revenue.
WE all know WordPress has got many plug-ins which do the same purpose, but as such feature is not present in Blogger By default. We have various hacks and Tips for Blogger blogs already, with some popular ones for this Widget.
The basic difference in the related posts widget for Blogger and those for WordPress are : the WordPress Plug-ins are more customizable and actually relate posts considering category, tags and content. While the Related Posts for Blogger does so using only the Categories in which you place the post. So for Better optimality of the Widget, limit the number of categories to just one or two. More categories would mean too many related posts.
Here i have collected hack for related post by few of fellow bloggers.
1)From widgetsforfree
Here is a simple and stylish widget from Widgets for free with customizable style sheet.
2)From Tweaked hack by Jackbook
Jackbook had tweaked the the Original hack by Hoctro, and made it a single install widget, and also removed current article being listed in related articles. So the hack is quite simple and you can try it out too. My say: Read on - better hacks are coming. Jackbook – related post widget
By taking jackbook widget i am trying to make few modification which i will be posting very soon.
If you like my post or to correct or add another type of Related post widget please leave a comment or mail me at softwaretester@gmail.com
Thank you
Bookmark widget - Part1
You may be seeing bookmaak icons below or above of each paost in so many blogs you visiting. This bookmark widgets sre the one of the simple ways to attract people to your blogs and also helps in increasing traffic to small blogs.
There are so many ways to insert this widget into you blog.
Here i am with one of the Bookmark widget which will not work like other bookmark widgets which will add individual posts to the social sites, this widget works in a different manner as it will add your total blog to the social sites.
To add this widget a simple method.
Login to Blooger dashboard --> Go to Layout page --> Click on Add Gadget
Select Add HTML/Javascript
Now Insert Below code into HTML/Javascript box and save it.
After adding this code a widget will appear in Sidebar as it look like below.

This is a simple one and in my next posts i will give you different types of adding bookmarks.
Breadcrumbs to your Blog
Breadcrumbs nothing but in other words page navigation which shows where you are and helps you to go to previous page. This feature gives your blog a professional look.
Suppose if you are viewing “Ads in middle of posts” post in my blog it there appears a breadcrumb at top of page like “You are at » Home » Tricks » Ads in middle of posts”. When you click on Home link in this it will take to my blog hoe page.

To apply these codes on your blog follow below instructions.
Before applying this code save your template
Go to the Layout tab, and click Edit HTML. Download your template as an XML-file and save it onto your harddisk. If anything goes wrong, upload it again and not much harm will be done.
We are going to modify the code which displays status-message above your posts when you have selected all posts with a certain label. The default-widget uses a so-called "includable" (a chunk of code. We will turn off this default status message, and replace it with our breadcrumbs.
Step 1: Go to Edit HTML page and check Expand widget template check box.
Scroll down through your expanded widget code and look for the following piece of code:
<b:includable id='main' var='top'>
<!-- posts -->
<div class='blog-posts hfeed'>
<b:include data='top' name='status-message'/>
<data:adStart/>
Now comment the status message lines by adding code in red
<b:includable id='main' var='top'>
<!-- posts -->
<div class='blog-posts hfeed'>
<!-- <b:include data='top' name='status-message'/> -->
<data:adStart/>
<b:includable id='main' var='top'>
<!-- posts -->
<div class='blog-posts hfeed'>
<!-- <b:include data='top' name='status-message'/> -->
<b:include data='posts' name='breadcrumb'/>
<data:adStart/>
<b:includable id='breadcrumb' var='posts'> <b:if cond='data:blog.homepageUrl == data:blog.url'> <!-- No breadcrumb on front page --> <b:else/> <b:if cond='data:blog.pageType == "item"'> <div class='breadcrumbs'> Browse » <a expr:href='data:blog.homepageUrl' rel='tag'>Home</a> <b:loop values='data:posts' var='post'> <b:if cond='data:post.labels'> <b:loop values='data:post.labels' var='label'> <b:if cond='data:label.isLast == "true"'> » <a expr:href='data:label.url' rel='tag'><data:label.name/></a> </b:if> </b:loop> » <span><data:post.title/></span> </b:if> </b:loop> </div> <b:else/> <b:if cond='data:blog.pageType == "archive"'> <div class='breadcrumbs'> Browse » <a expr:href='data:blog.homepageUrl'>Home</a> » Archives for <data:blog.pageName/> </div> <b:else/> <b:if cond='data:blog.pageType == "index"'> <div class='breadcrumbs'> <b:if cond='data:blog.pageName == ""'> Browse » <a expr:href='data:blog.homepageUrl'>Home</a> » All posts <b:else/> Browse » <a expr:href='data:blog.homepageUrl'>Home</a> » Posts filed under <data:blog.pageName/> </b:if> </div> </b:if> </b:if> </b:if> </b:if> </b:includable> <b:includable id='main' var='top'>Step 4: Optional
If you want to give your breadcrumb some look and feel add below CSS to your CSS style sheet.
<b:skin><![CDATA[/*
....
.breadcrumbs {
float: left;
width: 500px;
font-size: 12px;
margin: 5px 10px 10px 10px;
padding: 0px 0px 3px 0px;
border-bottom: double #EAEAEA;
}
....
]]></b:skin>
Step 5: Save you template.
NOTE: My suggestion is to add a comment
<!-- Breadcrumb code start --> at the begining of code you are adding.
And <!-- Breadcrumb code ends --> at the end of code you are adding.
So that you can delete the added code doesn’t work properly or when you don’t want it on your blog.
Ads in middle of posts
Every people want to place the ads in the middle of the posts as this help them to get good revenue. How to insert ads in middle of posts?
Here goes a small trick to insert your Adsense ads into middle of your posts.
Before going for this trick Save your template.
To save your template
Go to the Layout tab, and click Edit HTML.
Download your template as an XML-file and save it onto your harddisk. If anything goes wrong, upload it again and not much harm will be done.
Step 1: Login to Blogger dashboard and go to Edit HTML page.
Step 2: You must check Expand Widget Templates check box and Find the tag <data:post.body/>
Step 3: Now replace above code with below code
<div expr:id='"aim1" + data:post.id'></div>
<div style="clear:both; margin:10px 0">
<!-- Your AdSense code here -->
</div>
<div expr:id='"aim2" + data:post.id'>
<data:post.body/>
</div>
<script type="text/javascript">
var obj0=document.getElementById("aim1<data:post.id/>");
var obj1=document.getElementById("aim2<data:post.id/>");
var s=obj1.innerHTML;
var r=s.search(/\x3C!-- adsense --\x3E/igm);
if(r>0) {obj0.innerHTML=s.substr(0,r);obj1.innerHTML=s.substr(r+16);}
</script>

Step 4: Now note that you must replace <!-- Your AdSense code --> with your Adsense code..

Step 5: In every blog post put a special comment
<!-- adsense -->
in the exact point where you want to your AdSense advertising to be appeared.
Step 6: Save template.
Auto Read more option for blogger posts
Previously you might have inserted Read more option using
<Span class=”fullpost”> </span>
Before going for this trick Save your template.
To save your template
Go to the Layout tab, and click Edit HTML.
Download your template as an XML-file and save it onto your harddisk. If anything goes wrong, upload it again and not much harm will be done.
But here is a simple method which saves your time and after inseting this code your blog main page will look as below.

Step 1: Go to Edit Html page and check Expand widget template check box and search for below code.
<div class='post-body entry-content'>
<p><data:post.body/></p>
<div style='clear: both;'/> <!-- clear for photos floats -->
</div>
OR just search for below code
<p><data:post.body/></p>
Step 2: Replace the line marked in red color in above code with below code.
<b:if cond='data:blog.pageType != "item"'>
<div expr:id='"summary" + data:post.id'/>
<script type='text/javascript'>
var blogID = "Your Blog ID";
function retriveSummaryPost<data:post.id/>(json){document.getElementById("summary<data:post.id/>").innerHTML
= json.entry.summary.$t + "..."}
function createSummaryPost<data:post.id/>(POSTID){ var script = document.createElement("script");
script.src = "http://www.blogger.com/feeds/"+blogID+"/posts/summary/"+POSTID+"?alt=json-in-script&callback=retriveSummaryPost<data:post.id/>";
script.type = "text/javascript"; document.getElementsByTagName('head')[0].appendChild(script);}
</script>
<script type='text/javascript'>
createSummaryPost<data:post.id/>("<data:post.id/>");
</script>
<span class='rmlink' style='float:right'><a expr:href='data:post.url'>-->Read more...</a></span>
</b:if>
<b:if cond='data:blog.pageType == "item"'>
<div id='post_body'>
<data:post.body/>
</div>
</b:if>
How to find your Blog ID.
Log into Blogger dashboard and click on Layout link now you can find your Blog id in link bar as shown in image below.

Hiding Blogger navigation bar
You may feel odd by displaying of blogger navigation at top of you blog.
 To hide this nav bar here is a small trick.
Before going for this trick Save your template.
To save your template
Go to the Layout tab, and click Edit HTML.
Download your template as an XML-file and save it onto your harddisk. If anything goes wrong, upload it again and not much harm will be done.
Step 1: Login to blogger » Go to Layout page » Click on Edit HTML link » add below code just below <head> tag.
#navbar-iframe {
height: 0px;
visibility: hidden;
display: none;
}
Step 2: Preview template and Save Template.
How To Hide Label Count
You may be watching that there will a count will be displaying by the side of your Labels showing how many posts were there under each and every Label. Sometimes it looks odd for the people visiting your site.
So here is a simple hack to remove that Label count beside each Label.
Before going for this trick Save your template.
To save your template
Go to the Layout tab, and click Edit HTML.
Download your template as an XML-file and save it onto your harddisk. If anything goes wrong, upload it again and not much harm will be done.
Before applying below hack Label widget look like.

Step 1: Sign into Blogger dashboard » Go to "Layout" page » Click on "Edit html" link » Click on "Expand Widget Templates"
Step 2: Look for below code
<b:else/>
<a expr:dir='data:blog.languageDirection' expr:href='data:label.url'>
<data:label.name/>
</a>
</b:if>
<span dir='ltr'>(<data:label.count/>)</span>
</li>
</b:loop>
</ul>
<b:include name='quickedit'/>
In some templates above code will be in different format as shown below then remove the code marked in red in below code.
<b:loop values='data:labels' var='label'>
<li>
<b:if cond='data:blog.url == data:label.url'>
<data:label.name/><b:else/>
<a expr:href='data:label.url'><data:label.name/></a>
</b:if>(<data:label.count/>)
</li>
</b:loop>
</ul>
<b:include name='quickedit'/>
Step 3: Remove code marked red in above code
<span dir='ltr'>(<data:label.count/>)</span>
(OR)
(<data:label.count/>)
Step 4: Preview and Save the template.
After aplling above hack Label widget will look like

Adding meta tags to individual posts
I suggest not to go for this trick as if you want to add keywords to each and every post there should be “if condition” added for each and every post for example if you have 20 post in your blog then you have to add 20 if conditions. Which increase the weight on the page, like loading page and so?
However I recommend adding new keyword regarding your new post to your existing Meta tag. But if you still want to have this trick it is here.
Before going for this trick Save your template.
To save your template
Go to the Layout tab, and click Edit HTML.
Download your template as an XML-file and save it onto your harddisk. If anything goes wrong, upload it again and not much harm will be done.
Step by Step to add Different Meta tags description For Each Post in your blogspot blog.
Step 1. Find code below
<meta content='Your home page description' name='description'/>
<meta content='your keywords, keywords1, keyword2' name='keywords'/>
Step 2. Add red code to it. This should be your final code.
<b:if cond='data:blog.url == data:blog.homepageUrl'>
<meta content='Your home page description' name='description'/>
<meta content='your keywords, keywords1, keyword2' name='keywords'/>
</b:if>
Step 3.Now add below code just bottom of above code. This code is for the Meta tags for individual posts.<b:if cond='data:blog.pageType == "item"'>
<meta expr:content='data:blog.pageTitle' name='Description'/>
<meta expr:content='data:blog.pageName + ", your keywords, keywords1, keyword2 "' name='keywords'/>
</b:if>
Step 4. Don't forget to change description and keyword to your own. save it and done.
Don’t forget to change 'Your home page description' with your Site description,
'your keywords, keywords1, keyword2' with your site keywords and finally
In the below code change keyword to your page keywords'data:blog.pageName + ", your keywords, keywords1, keyword2"'
Happy Try if you find any difficulty please post a comment i will help you out.


